The pledge belongs to the donor-- so to create a new pledge, begin by finding the donor’s name record. Click the Names button in the left menu/name list management, and then select the name record. Next, go to the Navigation bar on the right and select PLEDGES. This page shows a list of all open pledges for this donor. To create a new one, click the Add New button.
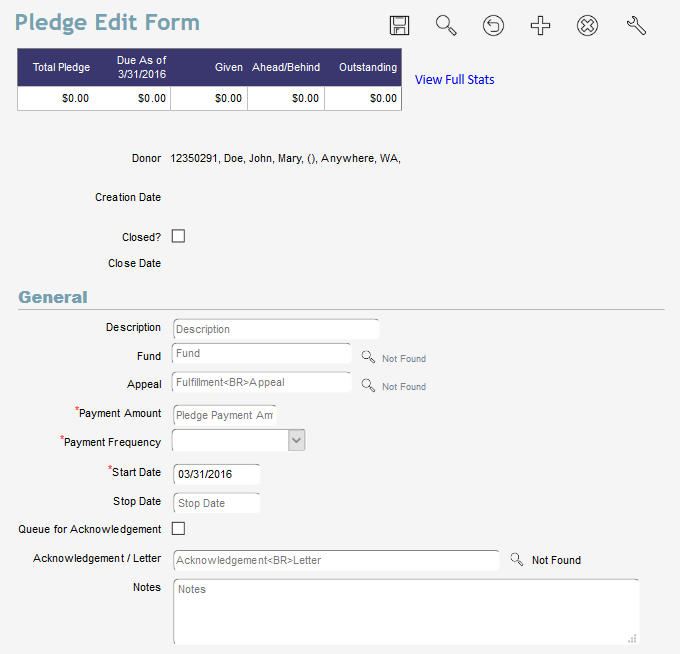
The first field below the donor information is the Creation Date. This is simply the date that you or the donor set up the pledge. This can be helpful later to get a list of new pledges.
Closed check box. Once this pledge is fulfilled simply check this box and hit save. The pledge will no longer show up as an option in gift entry and if it is a CC or EFT pledge it will stop running those transactions. The pledge will not be deleted and you will be able to see it later and even report on it if needed. Denari also will record the date that the pledge was closed.
The
Description field can be used for whatever information you would like. Its great value, however, is in
gift entry. The gift record has a drop down field showing all open pledges for a specific donor. That field shows this description field’s contents. If the donor has more than one pledge-- the description field, in that drop down field, can show which pledge to apply the donation. It helps you distinguish between the pledges so you will want to make your description distinctive. If you are a sponsorship organization, it is usually helpful to put the sponsored name in the Description field for that reason.
The
Fund and
Fulfillment Appeal codes are required fields. The fund code tells us what the money that the pledge generates will be used for. The Appeal code tells us what fundraising function generated this pledge. For more information on codes, please see the section on
Codes.
The Payment Amount is just that. It is the amount that the donor will pay each pay period. Enter a number here with no dollar sign and no zero decimals. So if the payment amount is $25 you can just put 25 in that field.
Frequency. You can see in the drop down that there are a variety of options like Monthly, Annually, Quarterly, etc.
The Start Date is a required field. It is the date the pledge will begin. It is also the anniversary date. For example, if the pledge is a monthly pledge for $25 starting on June 1, Denari knows that $25 is due on June 1. On July 1, Denari knows that another $25 is due, etc. Denari can track who is behind in their pledge payments based on the amount due which is based on the start date.
The Stop Date is optional but using it or not using it has consequences that you should know about. If you use a stop date Denari knows exactly how many payments to expect. If we set the stop date at 12 months from the start date then in our example, and the pledge is monthly, Denari can calculate the $25 payment times 12 and know that the Total Amount Pledged is $300. In the upper left corner of the page is a table that gives you a quick overview of the pledge. The first field there is Total Pledge and in this example, that will be filled in with $300 when we save the pledge record. We can now run reports that show the Total Pledged and quickly add up all the pledges to know exactly how much as been pledged in total. That’s very handy for budgeting.
The downside to using a stop date is that the pledge stops. If the donor wants to continue on with their pledge, someone has to either set up a new pledge or extend the stop date for this pledge. This requires more management effort.
The advantage of not using a stop date is that the pledge never stops. This is, of course, great for EFT or CC pledges. They will just go on until the donor tells you to stop. The disadvantage of not using a stop date is that Denari doesn’t know how many payments to expect so it can’t calculate an accurate Total Pledged amount. So what it does instead is use the number of payments from the start date. In our example of the $25 pledge starting on June 1, it will show the Total Pledged as $25. On July one, the Total Pledged will be $50 etc. This makes calculating the grand total of all pledges more difficult. You now have to total up the payment amount of your monthly pledges, annual pledges, etc. and put it all together to arrive at a total.
One other consideration -- Denari also calculates the Balance or Outstanding field. That is the difference between the Total Pledged and the Paid So Far. If no stop date is used and Denari can’t calculate the total of the pledge then the Outstanding field becomes irrelevant as well. There are other ways to determine if someone is behind in their pledge, however, so this may not be too big a problem. Ultimately, you will need to decide whether to use a stop date or not based on the pros and cons in your situation.
The next two fields relate to the
Pledge Acknowledgment. It is a statement format that Denari considers a one-time statement that is normally sent to the donor as confirmation of their pledge. The Acknowledgment by default is an 8 1/2 by 11 page with the bottom 1/3 showing the pledge information and the top 2/3 showing a
letter that you create. (You can do that clicking the Plus tab at the top and then letters.) To use this you will check the
Que For Acknowledgment check box and select the letter body that will be plugged into the top of the statement. When you run them, Denari will create the statements and then uncheck the box so that when you set up new pledges you won’t repeat them. There is both a printed and emailed version if you have purchased the
eCorresponsence module.
The Notes field can be used for anything you want related to the pledge.
If you are a
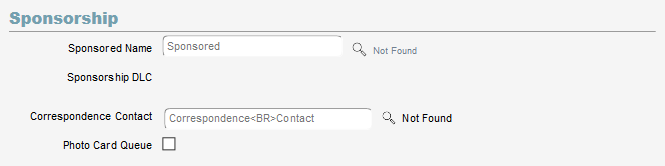
Sponsorship organization you will see the Sponsorship section.
The pledge is the link between the donor/sponsor and the sponsored name. It is the 'sponsorship'.
Sponsored Name. Click the search icon to search for and select the person or child to be sponsored. When you complete the rest of the pledge form and hit save, Denari will change the status of the sponsorship record to Sponsored depending on the status of the Multi-Sponsors field in the sponsored name record. When gifts are made and linked to this pledge, the sponsorship is updated.
The Sponsorship DLC (Date Last Changed) field shows when the sponsored name field was changed, if ever.
Correspondence Contact. This is optional, but can be used to link a second name record to the sponsorship. This might be someone who wants to also get information about the sponsorship from time to time. When you output pledge data from
pledge segmenter the Correspondence Contact address info will be included there. Select that person from you name list by clicking the search icon.
If you are a sponsorship user you will also see the Photo Card Queue check box in this section. Denari can produce a photo card for sponsored name records in an HTML format. It's usually a photo with some information about the person being sponsored. There are two ways to generate those. One, you can go to the sponsored name record and check the Queue Photo Card check box there. When you run photo cards, Denari will produce a photo card for those name records that you have checked. This field, however, relates to the donor. If you check the box here, when you run photo cards, you will get cards for any or all of the people being sponsored by this donor. To clarify, this field relates to the donor while the one found in the sponsored name record relates to the sponsored name. But, they both produce photo cards for sponsored name records.
If this pledge is to be paid by check, we can stop there and hit the Save button at the top of the page.
Pledge Schedule
At this point, Denari will create a Pledge Schedule. It is simply a list of payments with the date when the payment is due. Again, if this is a $25 per month pledge you will see 12 payments of $25 with the dates listed based on the start date. When needed, Denari will update the schedule as it moves along.
The schedule can be edited by clicking the Schedule button in the Quick Actions side bar. By default, this page shows all payments in the future and filters out those in the past. You can change that filter by clicking the
Quick Filter check box. If a donor calls to tell you that they can’t make the August payment, for example, you can open the schedule and change the payment amount for that month to $0. You could add a new payment to the end of the schedule to make up for the missed August payment as well, but it's not required. By zeroing out the August payment, the pledge stats won’t show that the donor is behind if you are sending out
pledge statements.
Pledge Stats
Denari calculates things like
Paid So Far,
Ahead/Behind,
Due So Far,
Days Behind,
Average Paid, and other things that Denari calls
Stats. Calculating those is a time consuming process that slows down the Denari servers. When you save the pledge Denari will calculate them as of that moment, but as time goes on the stats will only be updated during the night. Occasionally you may want to update the stats for a specific pledge rather than wait for the nightly routine. You can do that by hitting the
Stats button in the side bar. That will run the process for that pledge and update all of the stats.
There are some stats shown on the main pledge page at the top but you can see more information about this pledge by clicking the View Full Stats link to the right of the table.
There is one field here in the table that requires some explanation. That is the Due As Of field. This can be a little confusing but the key to this is the ‘As Of’ part. It shows what should have been paid to date. So if this is a $25 per month pledge and you are 3 months into the pledge then the Due As Of field will show $75 regardless of what has been paid. In other words, its not showing a balance or what is Due. The Ahead/Behind field shows the difference between what should have been paid, the Due As OF field, and the Paid So Far. It shows if they are ahead or behind in their pledge as of this date. If the pledge is behind it will show a number surrounded by parenthesis indicating that it is negative.
Credit Card and EFT Pledges
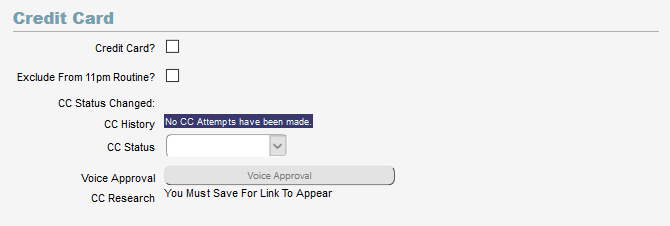
Pledges can be paid by CC or EFT and Denari uses the pledge record as the way to instigate and manage the process. Before setting up the CC or EFT information you will need to fill in the pledge information that we’ve covered so far and then hit Save. That will cause the CC or EFT links to appear below.
Setting up a CC is very similar to an EFT with a few differences so we can start with the CC. First you will check the CC check box. This tells Denari that this is a CC pledge. Next, be sure that the Status field is set to Live. That simply means that it's ready to go. You can change the status to any of the others when needed and Denari will use this field as well from time to time. As an example, you could put a CC pledge on Hold and that will prevent Denari from running that pledge on its next scheduled run.
Next you will
add the CC information by clicking the button (not shown here). It is important to note that when you when you enter the CC info, that
information goes directly to the credit card processor (Frontstream). It is not stored by Denari or by you. The reason for that is that Front Stream is
PCI Compliant which simply means that they meet all the standards for security set by the CC industry and are audited on a regular basis to be sure they maintain the security standards. Furthermore, that is the only time that the CC information passes over the Internet. Front Stream compiles the CC data on their end and gives it a code called a
PNREF. That code is sent back to Denari. When the CC transaction is initiated by Denari from the pledge, Denari only sends the code. Front Stream then matches the code with the CC record there and uses that to process the transaction.
This method does provide great security for your donor’s CC and EFT information, however, it does present a problem. Because Front Stream stores the CC and EFT info as a single record that means that the Expiration and CC number are bundled together into one record and stored at Front Stream. So updating a CC when the Expiration date is past is not possible. You can’t edit a CC or EFT record. When you need to update a CC record, you will need to set up a new CC record in the pledge by clicking the button again and entering the CC number along with the new Expiration.
When you click Validate, the processor will run a transaction to authorize the CC. This just sets up the card on their end and confirms that as of today, the CC is valid and can be used for transactions. The validation transaction amount will show temporarily on the donor’s bank record but will disappear quickly. This is the same process used by gas stations and stores so your donors should know what to expect if they happen to inspect their bank account before the authorization charge is gone.
The CC History section will show you the activity on the CC.
Now you will need to set up a Day of the Month and the Next Transaction Date in the Electronic Giving section of the pledge.
The Day of the Month is the day that you and the donor have agreed that you will transact their CC or EFT. These two fields work with both CC and EFT. So if the donor wants the transaction to take place on the 10th of each month, you will put the number 10 in that field.
The Next Transaction Date is the actual date that the next transaction will take place. So if this is October 1, you might set the NTD for 6/10/2015. The NTD field is an important field because it gives you control over when the transaction will take place. If the donor contacts you and asks you to skip next months CC transaction, you can change the schedule to adjust how Denari calculates the stats but you will also need to change the NTD so that it transacts one month ahead. Or, lets say that the CC runs on the 10th and fails. You may contact the donor to get updated CC info and now you can move the NTD two days ahead so that it runs again for that months payment. Denari will only run the transaction on the NTD. If that field is blank, the transaction will not process.
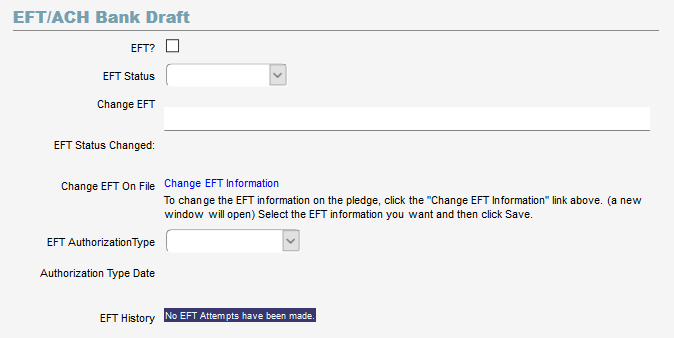
EFT Setup is very similar to CC setup.
The big difference between Credit Cards and EFTs is the time that it takes to transact. If you have a CC pledge with an NTD of June 10, then Denari will send the info to the processor on the 10th and the transaction will take place on the 10th. EFTs are different, however, because they have to run through the banking system. It can take as long as 10 days for EFTs to completely process and for the money to be transferred to your account. However, usually it only takes 2 to 3 days. If your EFT pledge is set to transact on June 10, Denari will send the info to Front Stream on the 9th. This starts the process so that the actual transfer of money from your donor’s account will take place close to the date they intended.
With both EFTs and CCs, Denari will automatically create a batch for you with all of the gift records at the same time that it sends the info to the processor. If the transaction is successful, Denari will advance the Next Transaction Date to the next period based on the frequency of the pledge. If it is a monthly pledge, it will move it ahead by one month so that it is ready to run again. This process is covered in more detail in the section on
Credit Card and EFT.
One other difference between Credit Cards and EFTs is that permission is required to legally access a donor's bank account through EFT. You will need to select an option in the
EFT Authorization Type field in the pledge record. This is covered in more detail in the section on
EFT Donor Notices.
Online Community and Sharathon Pledges
If you are using Online Community, Denari will create the pledge for you when an online donor chooses a pledge frequency other than One-Time. It will set up the pledge with a Day of the Month and Next Transaction Date and run automatically on those days, creating a batch as described above. The same is true for anyone using the Sharathon module. Pledges will be created through the volunteer form for you.
Reports
There are several ways to report on pledge activity with
Pledge Segmenter being the primary method. Denari also gives you the ability to send
Pledge Statements to update your donors on their pledge status and those can be filtered to send to everyone or to just those who are behind, or even those who are more than a set number of days behind, etc.
You can also find the Pledge Summary and Pledge Detail basic reports on by clicking the Reports button on the left then click Pledges. Information about credit card and EFT transactions can be found on the batch page where those transaction took place as well as the Pledge History section on the pledge page.
You will also find a number of reports related to CC and EFT pledges by clicking the Reports button on the left then click Electronic Giving. Here are a list of those reports...
CC On Hold Report
CC Pledge Expiration Report
CC Pledges Needing Credit Card Number
CC Pledges That Have Expired PNREFS
CC Pledges That Need CC Information
CC Summary Reports
These reports will help you manage your electronic pledges by helping you find pledges that meet these criteria.