All gifts entered into Denari are entered as a batch. There are several different types of gift records; Credit Card gifts, Electronic Fund Transfer or EFT gifts, and checks or cash. Denari has the ability to automatically create gift records for CCs and EFTs that re-occur periodically, like monthly. But for now we’ll focus on those gifts that are entered manually by a staff person. Usually those gifts come in the form of checks or cash, although you do have the ability to enter a CC gift manually which we will talk about later.
Batch Setup
We'll use an example to explain the process. Let's say that you have 10 checks that you want to enter today. First you will go to the Gifts/Pledges in the menu then click on Gift Batching. Here you see a list of the batches that have already been entered. Click Add New to create a new batch or container for your gifts.
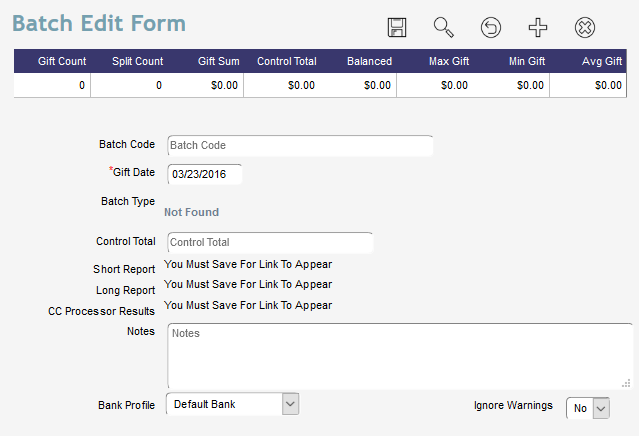
Notice that Denari has filled in the Gift Date field for you. It offers you today’s date but you can change that if you wish. All of the gifts in the batch will use that date. Denari doesn’t record the check date. Later, when you run reports based on gift date, this is the field that Denari will use.
The Batch Code can be anything you want it to be or be left blank. Some users put the reference number from a bank deposit slip here, if there is one, to tie a deposit to the batch. Some enter the initials of the person entering the gifts, if you have multiple people who do gift entry, so that if there are questions later they know who is familiar with the batch. Denari automatically fills in this field for an automated pledge gift and an Online Community gift.
The Control Total is required and offers a simple check to help you remember to enter all of your gifts for this batch. Its not fool proof but just adds a small check point. To use it, you first need to add up all of the gift amounts you intend to add to this batch. So in our example, we’ll add up 10 checks. Lets say that each check is for $100 so the total of all 10 checks is $1000. That’s what we’ll enter into the Control Total field. Enter 1000. You don’t need a dollar sign or zero decimal points.
The Notes field can also be left blank or used for anything you want. It can give you or someone else in the future clues about what types of gifts are in this batch.
The Bank Profile field can be used if you have multiple bank accounts with different types of gifts going to various accounts. For example, you may put foundation gifts in one account with all other deposits going to a different account. You can set up the values that will appear in this drop down by clicking the + sign and then bank profiles. Create as many records as you need there. If you are only using one bank account you can go to the gear icon and then preferences to select the default bank profile. Denari will then automatically fill in this field when you create a new batch with the default that you’ve selected.
We’ll talk about the Ignore Warnings field later.
Gift Record
Now that you have prepared the container for your gifts its time to begin to enter them. Do that by clicking on the Gift Entry link in the Quick Actions bar on the right. This takes you inside the batch container. Click the Add New button to create a new gift record.
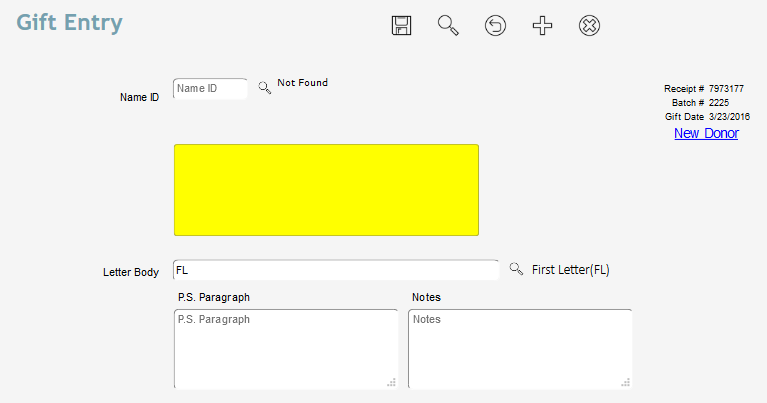
First, select the donor in the Name ID field. If you know the donor’s account number you can enter that into the field and hit the tab button on you keyboard. Denari will grab the donor’s name and address information so that we can check to be sure we have the right person. If you don’t know the account number you can click the search link to the right of the field. A search window will open where you can search for and select the correct donor.
If you click the search button you have two options for the search. By default you will see a universal search field. Type a name or any other information into this field, hit Enter, and Denari will return all records that reference that name. You might find that there are too many results so you have the option to select the Advanced search and search specifically for a last name, first name, address, account number, etc.
Once the donor has been selected Denari will pull in pertinent information into the box.
If the donor is not already in your data you can click the New Donor link on the right. This will give you a blank name record form which you can fill in to create the new record. Once you hit save, however, Denari does not automatically fill in the account number in the gift form. You will need to click the question mark to select the new name record here in the gift form.
On the right you will notice a box with some other info. One of those is the receipt number. Denari creates a unique receipt number for each gift record . That number will show up in various places in Denari and is the identifier for this specific gift.
Letter Body. The default Denari thank you receipt is an 8 1/2 by 11 page. The bottom 2/3 of that page shows the financial info related to the gift. The top two thirds is a letter body that can be created by you. Denari fills in things like the date, name and address, and the salutation and will plug in whatever letter body you select here. You can create them ahead of time by
going to the + sign and then Letters. Again, this is just the letter body that you are selecting here, not the entire receipt format.
The letter field here means that you can select a different letter for each gift if needed. For example, you might want a special letter for donations made at a recent fund raising banquet. You might have a different letter for donations made as a result of a mail campaign. Or, you might want just a standard letter for those who donate to you on a regular basis regardless of the event. You can control which gifts get which letters on the receipt.
There are three Notes fields available two shown here. You can put anything you want into any of these. The Split Notes field, which we’ll see in a minutes, resides with the split. If you have five splits in a gift, each split could have its own note if needed. The Note, which we also call the Gift Note usually applies to the entire gift. The PS Notes field is one that is built into the default thank you receipt template. It sits just below the letter body. Anything you enter here will appear on the receipt in that location.
Detail Section
Denari gives you the ability to enter a single gift that can be split between funds or pledges or can be split between charitable and non-charitable portions. For example, a donor may send a check in payment of two of their pledges. The check could be for $100 but $50 of that will go to one pledge and $50 to another. Or a donor may purchase a product from you with some of that covering the actual cost of the item and the rest being a donation. The cost portion can be entered as non-charitable and the donation portion as charitable.
When Denari prints the default thank you receipt it will list the splits along with the total amount of the gift. Technically there is no limit to the number of splits that can be entered. However, there will be a limit on how many can be printed on the thank you receipt. That is not really a Denari limit but a space issue on the page. At some point there are just too many to fit on the page. You may be asking, “What is the limit that will fit on the page?” That depends on the layout of the page and the size font used so its impossible to give you an exact number, however, four or five is a good round number.
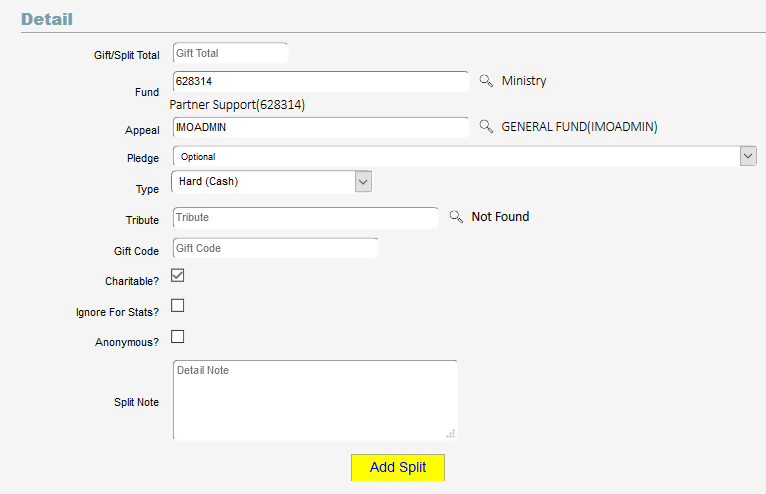
The first field in the Detail section is called Gift/Split Amount. Let’s say that a donor has given us a check for $100 and its not split between anything. We’ll enter ‘100’ in that field. It is a one-split gift. We don’t need to enter a dollar sign or decimals here unless they are necessary.
Next we can select the Fund and Appeal. The fund tells us what the money was raised for and the appeal tells us what fund raising function generated the donation. These are required fields and are important for tracking gifts later in reports. Click the search icon to find the values for those fields.
The Pledge field is where you will link the gift to a pledge. If the donor has an active pledge Denari displays that in this field. You can click the drop down to select the correct pledge. The field gives you some info about each pledge to help you select the correct one. If the donor has an active pledge but this gift is not intended as a payment toward that pledge you can click the drop down and select ‘Not a Pledge Gift’ from the list.
In the Type field you will find four options.
-
Almost all of your gifts will be
Hard. That is, they are cash, checks, CC’s etc. Here are the definitions for the others.
-
Soft is really kind of a fake gift. It can get used for several things but here are two examples.
-
Someone donates a gift in kind, let’s say it is a computer. Your accountant doesn’t really care about this donation unless its value is over a certain amount. But, your fund raising person does. That person wants to know that this donor made a donation, even if it wasn’t a cash type gift. So you can estimate what the computer might be worth and enter than in the Split Amount field and change the Type to Soft. Denari will create a record that will show in the donor’s gift history page with an asterisk next to it to let the fundraiser see the donation but the gift will not show up on most of the standardized reports. You CAN get a list of soft credits using gift segmenter, however. Denari will also not print a receipt for this gift because the IRS does not allow non profits to establish a value for tax purposes. You can send your donor a hand typed letter on your letter head with the date and what was donated for the IRS or, if you have a lot of gift in kind type gifts Denari does have a soft credit letter that you can use.
-
A second example is for a donor who donates to your organization through a third-party, like a foundation. The donor gives them the money and they give it to you. Legally you can’t receipt the donor. That’s the responsibility of the foundation. But again, the fundraiser wants to know that the donation was made so you can enter it as a soft credit. You will need to enter two gift records, one hard to the foundation, and one soft to the donor.
A soft credit is also Not included in the Control Total of the batch. So if we have 10 gifts that we are entering today, each for $100, but one of them is a soft credit, the Control Total will be $900.
-
A Soft Pledge is similar to Soft in that it is a fake gift but it gets used when the gift is being applied to a pledge. This is sometimes used with Child Sponsorship when a parent sends a check as payment on a pledge for a minor in their family who is the real sponsor. The pledge is linked to the minor’s name record. It requires that you enter two gift records, one hard and one soft. The parent can get a hard credit for the donation but the child’s donation can be soft and applied to the pledge.
-
Covered gift relates to Membership, if you are using that module. It works exactly the same way as the Soft Pledge but allows a donor to get membership credit for the donation.
Tributes are gifts in ‘memory of’. We won’t cover the Tributes feature here but you can set up the tribute record on the donors tab then link the gift to that tribute here. The drop down shows all of the open tributes.
The Gift Code field can be used for anything you would like. It can be used later as a filter to produce a report. Most of the time you won’t need this field. You can use other fields like appeals, fund, tributes, etc. as filters for your report.
The Charitable check box is where you can indicate that this gift is charitable. Unchecking the box, of course, will make it non-charitable. The default thank you receipt will show charitable or non-charitable for each split.
Ignore For Stats causes this gift to not be included when Denari calculates things like Year To Date, Last Gift, First Gift, Largest Gift, etc. for this donor. It is rare that you would use this field.
The Anonymous check box only works with the Missionary Module. It will remove the donor’s name from reports that missionaries see when they log in through their interface. If you are not using that module, this field will have little functionality for you, although you can get a list of Anonymous gifts with gift segmenter.
Splits
So far iin our example, you have learned how to entered a one split gift. If this gift is a multiple split gift you will simply enter the amount of the first split in the Split Amount field. So, lets say that this gift is a $100 gift with two splits of $50 each. Enter ‘50’ into the Split Amount field and fill in the other fields for that split. Now hit the Add Split button. A new window will open that has the same fields we saw on the main page. Fill in that information for the second split and click Save when finished. If you wanted to enter other splits you can hit the Add Split link at the top of the window and continue.
Back on the main page you will now see both splits listed there. You can delete a split by clicking that link and you can edit the split by clicking somewhere on that row. The window will open and we can make changes there as needed. Again, hit Save when you are finished.
Payment Information
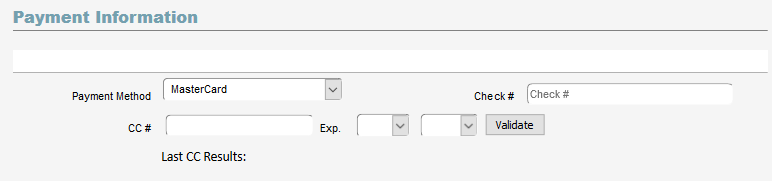
Next you can click the Payment Method drop down to select the method. Across from that you can enter the Check Number when appropriate.
Denari has the ability to process a single gift by Credit Card from the gift window. You will need to have set up an account through Practical Business Solutions for this to work and the CC module needs to be turned on in Denari. Once turned on, you’ll see the CC fields. Enter the card information, then click the Validate button. Denari will send the information to the credit card merchant to validate the card which is simply verifitying that it is a valid card. Once the card has successfully validated, a button will appear that will allow you to complete the transaction. The card will process immediately and Frontstream will put the money in your bank account.
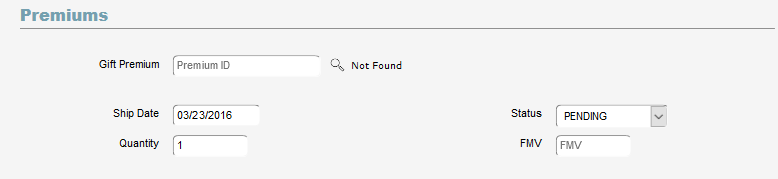
Premiums
Premiums are gifts given as a reward for a donation and this section allows you to assign a premium to this donor or gift. Premiums are covered in a separate section.
Back to the Batch Page
If you have more gifts to enter in this batch, click the Plus sign at the top of the gift page. Denari will save the record you just finished and give you a new blank gift record. If this is the last gift in the batch, click the Batching button in the upper right Quick Actions section. That will take you back to the batch screen.
At this point, the gifts have not been posted to the donor. If you were to run reports or thank you receipts these gifts would not be included. The next step in the process is to Close the batch. Closing will post the gifts. At the top of the batch page you will see a small table with some information about the batch. One of the columns here is Balanced and you should see a $00.0 amount. That simply means that the dollar amount of the gifts that you’ve entered into the batch is equal to the Control Total you set earlier. If the total does not match the word Balanced will not appear there. Instead you might see ‘Remaining’ which means that the total of the gifts entered is less then the Control Total and you’ll need to go back into the batch to add more gifts or correct a problem. The Close button will also not appear in the button bar until the batch is balanced. Occasionally you may need to change the Control Total rather than change the gifts. Simply change the amount and hit Save.
There are other reasons why the Close Batch button doesn’t appear. If the batch is a CC or EFT batch, you must first hit the Download Processor Results button. That downloads the latest information about the transactions from Front Stream. Without that, Denari can’t update the batch so it won’t let you close until you’ve done that. That is discussed in more detail the section on Credit Cards and EFTs.
Once the batch is closed the Close Batch button will change to say Re-Open Batch. You can re-open a batch if there are fewer than 100 gifts in the batch. If there are more than that, you can contact tech support and they will open the batch for you. Here are some reasons why you might want to re-open the batch. You might need to change a fund or appeal code for a gift, you might need to link a gift to a pledge, you might want to change the letter, you may need to delete the gift record, and many more. An alternative to re-opening the batch is to do a Gift Reversal. That will zero out the gift without having to re-open the batch and allow you to then create a new gift record with the correct information.
Note: Only users with an Access Level of System Administrator can re-open batches. See User Setup for more information.
You can go back into the batch whenever needed if the batch is open. Simply hit Gift Entry. That will take you to a list of the gifts already entered. On this page, each split is listed on a separate row. At this point we can click Add New to add more gifts to the batch or click on one of the existing gifts to edit. Clicking anywhere on one of the splits will put us back into the gift record. We can make the changes, hit Save, and then click on Batching again to take us back to the main batch window. Since the batch is now balanced we can Close the batch by clicking that button.
At this point we see three new buttons. One is Re-Open Batch. Closing and Re-Opening batches is a fairly stressful task on the Denari servers so you can only re-open batches with fewer than 100 gifts. If you find that you need to open a larger batch let tech support know and they can do it for you. Once the batch is re-opened you can make changes to the gifts if needed.
The second and third new button is the Receipts button and if you have eReceipts installed you will see that button as well. Use these buttons to print thank you receipts.
Reports
Near the center of the batch page you will find the Long and Short reports. One or the other of these is usually what are used to give to the accountant to reconcile the batch. One gives you more info than the other.
If this is a Credit Card batch you will find the CC Processor Results report. If it is an EFT batch you will find the EFT Processor Results report. Denari simply sends the CC and EFT information to the processor or merchant account. They process the transaction and put the money into your bank account. These reports show you the transactions from their perspective. Before you run these reports, click the Download Processor Results report. That will download the lastest information from the processor to Denari.
In the Quick Actions section you will also find a number of report links.
Type Summary-Batch and Type Summary-Gift Date are reports that summarize the gifts in the batch by Payment Type (hard, soft, soft pledge, covered) or by Gift Date. These can be usefull if you are manually entering transactions into your accounting program.
The other reports in the Quick Actions section are credit card or EFT reports and will be covered in the Credit Card and EFT section.
Ignore Warnings
The final topic here is the Ignore Warnings field mentioned earlier. When you close a batch Denari does some basic checks. It checks, for example, to be sure that the appeal and fund codes on the enclosed gifts are valid and active. It checks to be sure there is a bank profile selected. And it checks to be sure that all of the gifts are linked to a donor. If it finds a problem it will prevent you from closing the batch and display a link with some information at the bottom of the batch form. That message gives you the receipt number for the gift or gifts with the problem. This is your clue to go back into the batch and correct the problem.
But sometimes you may want to close the batch regardless of those problems. For example, it is not uncommon for a donor to call at tax time to let you know that there was a mistake with one of their gifts. You can go to the batch that holds the gift with the problem, re-open it, correct it, then close the batch. However, the gift may have originally been entered months or even years earlier and you might have closed some or all of the fund codes selected in the gifts in the batch. Now when you attempt to close the batch Denari does its check, finds the closed fund codes and gives you the error message. It won’t let you close the batch. Rather than re-activate all of the fund codes you can simply change the Ignore Warnings field to Yes. You are telling Denari to ignore the warnings and go ahead and close the batch.