TODO: To change the footer's content go to Dr.Explain menu Options : Project Settings : HTML (CHM) Export : Setup HTML Template and Layout
User Setup
You have the ability to control who accesses your Denari data and how much of that data they can see or access by creating a user record for them. A user record contains the user name and password as well as some other information along with security settings for each user.
There are some rules related to users and Denari that we should cover.
First, a user license is required for each person who will be logging into Denari. Additional licenses, when needed, can be purchased from our admin office by emailing to sales@denarisoft.com or calling (800) 352-0312.
Each user should have their own user record. Only one person can be logged in at a time with the same user record. If a second person attempts to log in using the same user name/password the second person will kick out the first person.
Once you have reached your license limit of users the Add New button will disappear and you won't be able to add new users.
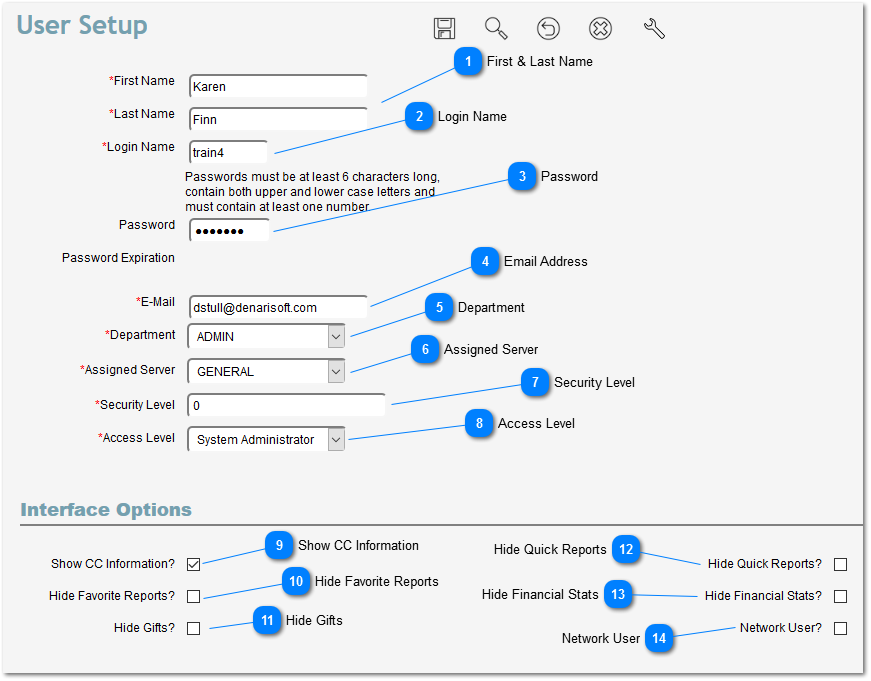
Now you can set up your users. Click the Gear icon at the top of the page and, in the Admin column, choose USER SETUP.
When your Denari company is initially set up by Synergy you will have one user record that will allow you to log into your data. You can edit that record or add a new one. In either case, you'll need to click on one of the records that are there to get to the Add New button. Note: The Add New button is only available from inside an existing user record.
First & Last Name
Enter the first and last name of the person using this user record. The user record can be linked to several functions in Denari and the user's name can show there. For example, if a user contacts tech support through the support system the name from this record will carry through with their tech support message making it easier for the tech support staff to identify the person they are working with. The name can also show up in contacts and other functions.
This can also be referred to as the User Name. This will be needed for this user to log into Denari. This field must be unique. There cannot be two people using the same Username in either your company or any other Denari company so using something like 'Susan' may not be a good idea. There are probably several Susans using Denari in other organizations. Denari will check for duplicates when you leave this field and will not let you proceed until you have a unique username. Also, remember that this field is case sensitive.
Enter a Password. In reading the text above that field you'll see that it must be at least 6 characters long and have both upper and lower case characters as well as at least one number.
Enter the person's email address. Having the correct email address here can help the staff in tech support. That email address shows in the tech support messages that are generated through the Support button at the top of Denari. Occasionally we need to send something to you that can't be sent through the message system and having the email address there makes it much faster and easier to fire off an email. There are also some features in Denari that send an email notification and this is the email that will be used for that.
It is possible to organize users into Departments. You can create new Departments by clicking the Plus sign at the top and then selecting Departments. It is actually the same list of Departments that you would use for Fund Codes. There is one advantage to grouping users into departments and that is when you run some standardized reports. One of the Distribution options is "My Department". When you run a report, choosing that option will cause it to show up in the In Box of everyone it your department.
The Assigned Server will always be General unless someone from the Denari staff tells you differently. There are multiple servers that handle Denari's various print jobs. This field designates the server that will handle reports for this user. Almost always it will be General unless there are special circumstances.
There are two methods to control user access to Denari. The most basic is Access Level (see below). The Security Level setting allows for a more detailed level of control, even down to the field level and is optional. You can prevent someone from seeing selected fields or making changes to those fields. This topic can be a little complicated and will be covered in more detail in the Security Level topic. Many of Denari's clients find this level to be more than they need. The important thing here is that if you will not be using the Security Level control, everyone should have either a zero or 100 for their setting. This gives them access to Denari to the level of their setting in the Access Level.
You must assign an access level to everyone. The options are:
System Administrator: This gives the user full access to all of Denari. You must assign this level to at least one user in your organization but you can have more than one.
Data Entry User: This person has the same access capability as the System Administrator except for the items that are administrative in nature. So, for example, a data entry user can't change system settings, can't add or change users, export data, etc. . They also cannot re-open batches and some other system control type functions.
Management: This level has fewer access abilities than the Data Entry User. It is intended for the person who doesn't use Denari a lot but does occasionally need to run reports, see a donor's gift history or pledges, etc. They are not able to create or change gift records, pledge records, appeal codes, fund codes. Etc.
Read Only: This level allows just that, the user can only read the information in Denari. They can't change anything.
Unchecking this box means that even though the user may have System Administrator or Data Entry access they will not be able to view or edit CC and Electronic Transfer Banking information. So if you have someone, for example, who needs to re-open batches from time to time or they need access to the Admin page, you can still restrict them from changing CC information if needed. A quick note about Credit Card Information in Denari. Denari does not store or display CC info to anyone. A user can only see the first and last four digits of CC info and Electronic Fund Transfer bank information. But, users can change CC and EFT information if they have the access level setting that will allow that.
Refers to those reports found by clicking the Reports link on the left then clicking Quick Reports then Favorite Reports. These are reports that can be memorized and saved to run when needed or scheduled to run at a specific time. Most of those reports show donor giving information. Checking this box prevents this user from running those reports.
Refers to the reports found by clicking the Reports link on the left then clicking Quick Reports and Quick Reports again. These reports provide basic giving information that you may not want even a data entry user to access. So unchecking the box will prevent that.
Network User is a feature used by organizations who have multiple Denari companies set up. This topic will be covered in a separate training session. However, briefly we can say that Denari offers an add-on ability to link multiple Denari companies together in a network that can share users and reports. You can include this user in the network by checking this box.
Once you have the settings the way you want, hit Save and this user will now be able to log into your Denari data. You can come back and change the settings any time you'd like.