TODO: To change the footer's content go to Dr.Explain menu Options : Project Settings : HTML (CHM) Export : Setup HTML Template and Layout
Fund Codes
The purpose for Fund Codes is to track your fundraising efforts in terms of how much money has been raised for projects and general expenses. Every gift and pledge that is entered into your data must have a fund code. A great example is the General Fund, or whatever your organization calls it. You will certainly have a fund code that represents that fund. It then allows you to determine at any time, how much money has been raised for that fund. But of course, you’ll have others. If you were building a new building, for example, you could create a fund code for that. Other examples might be staff members who raise personal support, health clinics, equipment, etc. Any reason for fundraising can become a fund code.
It is easy to confuse fund codes with appeal codes. Remember, appeal codes track your fundraising efforts but fund codes track the reason for raising the money. You may have many fundraising efforts that raise money for a specific fund. You might hold a golf tournament that raises money for the new building. You might have a special letter campaign that raises money for the new building, etc. The golf tournament and letter campaign are appeals. The new building is the fund.
Fund codes very often parallel your accounting system, although that’s not required. Your accounting system usually tracks funds so the concept is similar. Fund codes allow you to run a report from time to time to determine how much money has been raised this month for the new building fund.
You can create a new fund code in one of two ways. The easiest is to click the plus sign at the top of Denari then click New Fund from the Quick Items menu. You can also click the plus sign and click on the Fund Codes link in the Codes column. This will bring you to a list of your existing fund codes. You can edit one of those by finding the one you want then clicking on it to open it. You can also click Add New from this page to create a new code. Either method will bring you to the form below.
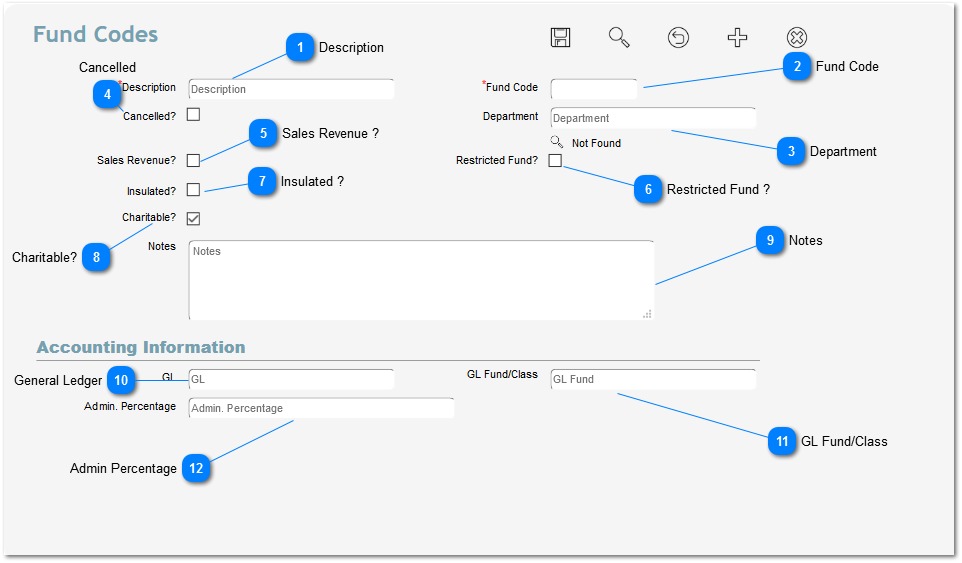
Description
This field is for you. It describes to you and your co-workers what this code is about. If you are using to track funds for a New Building you might type ‘Building Fund’ here.
This field is the identifier for Denari. It tells Denari that this fund is different from any others so it must be unique. You can’t have two fund codes the same. Some people keep this pretty simple and in our example we might enter BF there. Some users, however, have a strategy for their codes. For example, they might start all of their Personal Fundraising for Staff codes with a ‘PF’ then give each one a number so their codes might be ‘PF100’, PF101, etc. Another type of fund might start with a different letter or set of letters followed by numbers. This can be helpful in reporting since we could use that to produce a list of gifts, for example, that have fund codes that run from PF100 to PF500. But from Denari’s perspective, the only requirement is that they be unique.
The Description and Code fields are the only two required fields on the page. We could stop here if that’s all we need.
A department is an optional grouping function for fund codes. We could, for example, create a department called Personal Fundraising and then link all of the staff member fund codes into that department by selecting it here. The big advantage is that it can make reporting a little easier. If we have 20 staff members we could simply get a list of gifts to the Personal Fundraising department rather than having to use the PF100 to PF 500 filter. Either method works, its just a little easier using a department code.
Of course, you will need to create the department code prior to setting up your fund code.
The Cancelled check box allows you to close or cancel this code. Checking the box means it is closed. This prevents someone from linking a gift to this code by mistake. It also makes the list of fund codes in gift entry shorter and easier to manage.
The Sales Revenue check box allows you to indicate that any gift to this fund is really a sale and is non-charitable. You might set up a fund code called ‘Book Sales’ if you are selling books. You can record the revenue in Denari by linking those sales to this fund code.
This field has no specific definition in Denari, therefore, you can define it in any way you want. Let’s say that you decide to define Restricted as being funds that can only be used for the new building as opposed to funds that are intended for the building but could be used for other things if needed. Checking this box is a way to tag a specific set of gifts so that you can later get a list of just those restricted gifts.
Denari has a feature called Power Tracker that categorizes all name records into categories. It is a tool that can be used to manage mailing campaigns. Checking the insulated check box will remove any gifts used in the categorization from the process. For example, one of the Power Tracker categories is 'Contributor'. Checking this box will prevent any gifts with this fund code from being used to determine who is a contributor within Power Tracker only. There are other report tools in Denari that allow you to find names who have made donations with or without this box checked. This only applies to the use of Power Tracker.
By default, all gifts within Denari are considered to be Charitable or Tax-Deductible unless you tell Denari differently. Checking this box will cause any gifts linked to this fund code to be considered Non-Charitable. You can also make gifts Non-Charitable in the gift record on a gift by gift basis.
The Accounting Information section relates primarily to the QuickBooks export feature. If you will not be using this feature then you can ignore them. This field can also a Peach Tree export available. The GL field is where you will enter the general ledger account number from QuickBooks that corresponds with this fund. This is a required field if you are using Quick Books Export.
The GL Fund is really the Class in QuickBooks. Classes must be turned on in QuickBooks to use Denari’s QB Export and you will simply transfer the class for this fund in QB to this field. Now when you run the QB Export from Denari it will produce an output file using this information. You will then import that file to QB. This is a required field if you are using Quick Books Export. Check out the section on Quick Books Export for more information.
Admin Percentage relates to the QB Export process. Some organizations have decided that a percentage of any money raised for some funds will be applied, usually to the General Fund. Let’s say that 5% of any personal support money raised will be go to the General Fund. Simply enter a ‘5’ here. During the QB Export process you will enter the account number and class where that 5% will be deposited in QuickBooks. Denari will do the math and produce the output file with those amounts and it will then be imported to QB in that way. If you don’t need this admin percentage field you can simply leave it blank.