The most flexible way to code donors is by using Classifications. Classifications can be anything you want them to be. You can have as many as you want and you can assign as many as you want to any one name record. When it comes time to use them for reporting you can use them in combinations and you can use them to exclude groups of people from lists.
If you want to keep track of all the people by relationship to your organization you can create those classifications and then assign them appropriately. So you might have People Who Attended the Spring Banquet, Major Donor, People Who Don’t Want Mail, People Who Are Volunteers, etc. When it comes time to do a mailing you may want to target the Major Donors who attended the Spring Banquet. Or you may want to get a list of volunteers who attended the spring banquet, etc. Those scenarios are both possible using classifications.
One of the things that makes classifications powerful is the ability to exclude classifications from your output. For example, you may want to do a mailing to the people who attended the spring banquet but exclude those who have told you they don’t want mail. Classifications are the only code system in Denari that allows you to do that.
You can also assign a classification to a name record temporarily. Suppose you want to do a mailing to everyone who has given in the past but not those who have given in the last three months. First you can create a classification then assign that to those who have given in the last three months. There is a mass classification tool that you can use. Next, you can create your mail list using Name Segmenter and exclude the Last Three Months classification. Denari will find anyone who has given in the past and exclude those who have given in the last three months. Now, once you have your mail list, you can delete that classification and it will be removed from each name.
You will assign classifications to name records from within their record. Click the Names button on the left the Name List Management. Select the name record. On the right you will find a link to the Classifications page for that name.
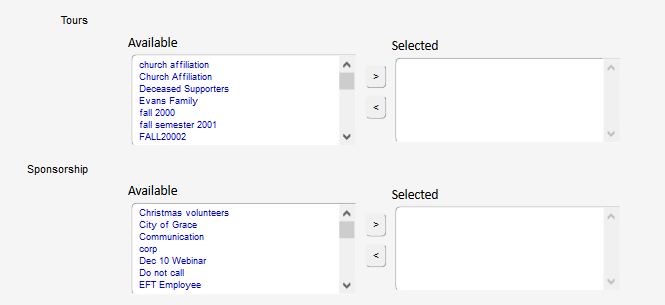
This graphic is only showing two categories but there are really five in total. You cannot add categories or remove them. Each categorie has a name. In this case the names are Tours and Sponsorship. The categories are a way to help organize your classifications and ou can change the names of the categories to fit your organization.
The classifications are inside the groups. In this case, we see 'Christmas Volunteers', 'City of Grace', 'Communication', etc. in the Sponsorship category. There is no limit to the number of classifications you can set up and there is no limit to the number that you can assign to any one donor.
To assign a classification to this name record, click on it on the left to highlight then click the arrow button to move it to the Selected side. To unassign one, just reverse that process.
You can create your classification list by clicking the Plus sign at the top of Denari then click Classifications. On this page you will see a list of your exisiting classifications. You can click on one to edit that record or click Add New to create a new one.
 DescriptionThe Description is what the classification is about. If this classification will track those who attended the spring banquet, for example, then you'll enter 'Spring Banquet' and you could add the year if needed.
|
|
 CodeThe code is for Denari. It tells Denari that this record is different from any other classification record so it must be unique. You can use letters and numbers and other symbols like underscores and dashes.
|
|
 CategoryThis is one of the five groupings mentioned above. Each classification must be in a category so it is a required field.
|
|
 Export NameThis field is optional and most of the time you will NOT use it. The paragraph just above the field explains what it is about. "If this field is left blank this classification will not be in the Excel output from Name Segmenter". Why would you not want this in the output? The Excel output shows each name record in it's own row with each field in columns. There is a column for name, address, etc. Each classification is also a column and there is an 'X' in the cell that corresponds to each donor with that classification. The problem comes from Excel. It will only displays a limited number of columns. If you have 500 classifications, Excel will not display them all and, in addition, you will have an enourmous file. So it is best to keep the number of classifications that you will display in the Excel output from name segmenter to a limit. You do that by putting or not putting something in this field.
You can do this on a temporary basis if necessary. If you need to see a classification for a specific list of names you can come to the classification, add the name to this field then run the segment. You can, once you have your list of names, then come back to the classification record and remove the name from this field.
|
|
Click Save to create your classification.
Classification Categories
You can change the names of the five categories by clicking the Plus sign at the top of the Denari page and choosing Class Categories. The table there shows you the five categories and what they are named now. Click on the one you want to change and enter the new name in the Description field. Click Save and the category name is changed.
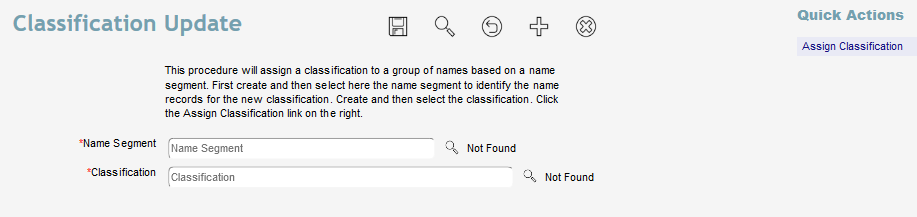
Classification Update
It is possible to assign a classification to name records in mass using a name segment. The segment identifies the list of names. For example, you could use the segment to identify anyone who have more than $5000 this year. You can then take that segment and assign the classification 'Majory Donor' to that set of names.
Once you have created the segment, click on the Gear icon at the top of Denari and choose Name Class Update.
Select the Name Segment and the Classification and click the Assign Classification button in the upper right. Classifications can be deleted, as mentioned earlier, so this tool is a good way to temporarily assign a classification when needed.