TODO: To change the footer's content go to Dr.Explain menu Options : Project Settings : HTML (CHM) Export : Setup HTML Template and Layout
Quick Books Export
Three important facts...
Quickbooks Export outputs a file that you can import into QB. It does not link directly to QB.
It outputs the data grouped by fund code, not by donor. Some organizations have used QB, prior to coming to Denari, to track donor activity. Denari’s approach is different. You will use Denari to track donor activity and QB to track revenue and expenses.
Your fund codes in Denari will closely relate to your accounts in QB.
Setup
Begin by setting up your fund codes. To do that, click the Plus sign at the top and then click on Fund Codes. If you are creating a new fund code, click on Add New. Move down to the Accounting Information section.
Here we have three fields that are related to QB export, and also other accounting software exports that are available.
The donations entered into Denari all have a fund code and those fund codes must be parallel to your QB accounts. For example, you might have a General Fund fund code in Denari and a General Fund account in QB. Denari is going to produce a file that will summarize donations by fund code and, when imported, create entries in your QB accounts related to the fund codes.
The GL field is where you will put the General Ledger code from QB. Across from that, is the GL Fund/Class field. You will enter the Class for this account in QB. You must have Classes turned on in QB and a class set up for each of your accounts.
The Admin Percentage field is optional. It can be used when you want a specific percentage of money raised for this fund code to go to a different account, usually your General Fund account. Some organizations, for example, have a policy that says that any money raised by staff members will have, let’s say 5%, pulled out and put into the General Fund. If that’s the case, simply put a ‘5’ here.
Click Save and set up the rest of the funds that will be included in the import to QB in the same way.
Import
Click on the Reports button on the left then Exports and finally, QuickBooks.
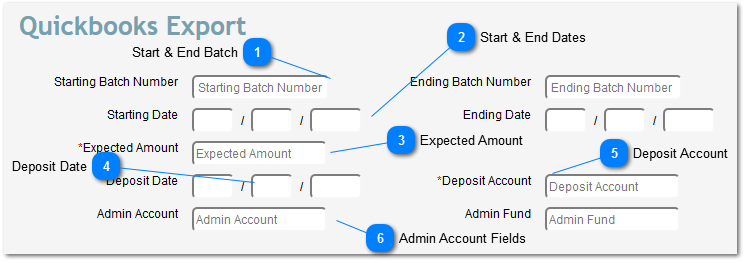
Start & End Batch
Gifts are entered into Denari by batch number and you will do the import by batch. If you want to just do one batch, you can put that batch number in both the starting and ending fields, or you can do a range of batches at once.
Related to that Admin Percentage field the fund code set up record. If you are using that percentage field you will need to enter the QB account number for those amounts in the Admin Account field and enter the Class in the Admin Fund field. When you run the export, Denari will calculate the percentage for the funds you have indicated and create a separate transaction for the Admin account.
Click Export Data in the Quick Actions menu and Denari will create a file and put it in your In Box. The file in your In Box will have a TXT extension. Newer versions of Quickbooks can import that file without any modification. Older versions require a file with an IIS extension. If that’s your situation, you can download the file and change the extension. QB will then import the file.
When you click on the file in the In Box you get a window with instructions for how you can download the file to your computer. At that point you can enter QB and import the file. QB will create the transactions for each account/fund.