TODO: To change the footer's content go to Dr.Explain menu Options : Project Settings : HTML (CHM) Export : Setup HTML Template and Layout
Add New Name
There are three ways to add a new name record in Denari. The quickest and most direct is by simply clicking the + sign at the top of the page and then click on New Name. Since the plus sign is always visible wherever you are in Denari this method will probably be your go to method for adding new names.
Second, you can add a name by clicking the Names button on the left, then Name List Management, then click Add New. And third, you can click the New Name link from the gift entry screen.
All three methods bring you to the Adding New Name screen and most of this is pretty self-explanatory. Just enter the name and address information. However, let’s take a few minutes to discuss a few of the fields.
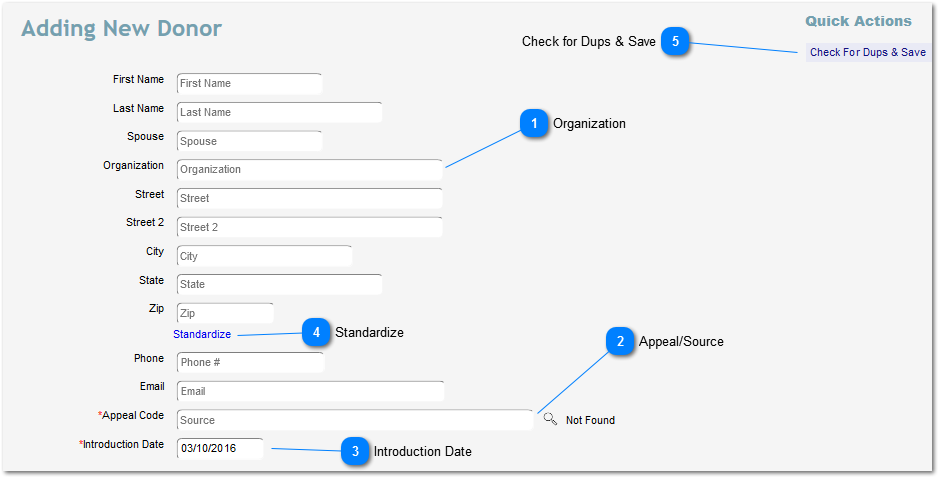
Organization
When Denari prints statements like receipts, pledge statements, end of year tax statements, etc. it merges the name and address into the address block on the statement. That address block has functionality built in that is designed to make the block more attractive and readable.
The address block function uses a field called Contact Name. When you add this new name record Denari will automatically populate the Contact Name field with the first, spouse, and last names that you enter here. You can then change that field so that the name is printed the way you prefer it to be seen in the address block on statements. It might say something like "John and Jane Doe." Some Denari users prefer a more formal format like "Mr. And Mrs. Doe". You can put that into the Contact Name field and that's what Denari will use in the address block.
So what does that have to do with the Organization field? Here's how the address block functionality works.
If the Organization field is blank Denari will put the Contact Name in row 1 of the address block, the Street Address in row 2, if there is a street 2 it goes into row 3, and the City, State, and Zip in row 3 or 4, again depending on the contents of street 2. And then if there is a Country it will go in row 4 or 5.
If there is something in the Organization field, Denari will put the Organization field in row 1, the Contact Name is row 2, the Address in row 3, and the City State Zip in row 4. This can create a small problem however. If you put the name of an organization in the organization field and also again in the Contact Name field it will appear twice in the address block. So you should decide early on how to handle this for your organization. If you decide to store the name of the organization in the Organization field then you should leave the Contact Name field blank unless there is a person who is the contact for that organization that can go in that field. There is one small issue with this method and that is when you create a new name record and you leave the First and Last Name fields blank, Denari will not fill in the Salutation field automatically. You will need to manually do that later once the record is set up.
This is a required field. It tracks where this name record came from; which of your fundraising functions generated this new name. It uses your list of Appeal codes. They represent your fundraising events or methods. This field does not track the donor’s gifts and where they came from. Only the event that initially brought this person to your data. If the donor makes donations in the future those gifts will have their own appeal codes which may be totally different from the appeal code here.
This is the date that the name record was added to your data and you can make this any date that you want. It allows you to get a list of names that were added to your data in some date range. You could, for example, send a letter to welcome all new names that were added in the last month and you would use this date to produce this list.
The next step is to Standardize the new name and you do that by clicking the Standardize link. Denari compares the name information with the Post Office database and changes it to match if needed. The reason you standardize now is for the next step.
Click the Check for Dups & Save button in the Quick Actions section on the right. At that point Denari is going to compare the standardized information you’ve entered here with the standardized name records already in Denari. By default it looks at the last name field, the street address, and the zip code. If it finds a match in all three of those it will flag the record as a possible duplicate and will pop up a little window that shows you the existing name record. You then can make a decision about whether the new record is really a duplicate or not.
If the new record is a duplicate you can click the link in that record to go to the existing record. If it is not a duplicate you can click the Save and Create a Dup in the Quick Actions bar on the right to add the new record and Denari will then bring you to the full name screen.
Once you are on the main name screen, your next step is to review the Contact Name and Salutation fields to be sure they entered the way you want. You will also want to properly code the new name if needed.