TODO: To change the footer's content go to Dr.Explain menu Options : Project Settings : HTML (CHM) Export : Setup HTML Template and Layout
User Defined Fields
User Defined Fields are fields that you can create to hold information that Denari does not already have a place for. You can use these fields as filters for reports later on. Using these fields is a two step process. First you must set up the field and second, you must then populate the field in each donor's name record. To illustrate the process we'll use a hypotheical Red Cross organization who needs to store donor's blood types. Denari doesn't have a specific field to store blood type. But, you can do that by setting up the blood type field as a User Defined Field and then using that field to store the blood type for each name record. Of course, you can create a UDF field for almost any bit of information you'd like to store and use later as a filter to produce a list of names.
Setup
Click the Gear icon then USER DEFINED FIELD SET UP. The first page shows the list of all of the user defined fields that someone has already set up. Click ADD NEW to create a new record.
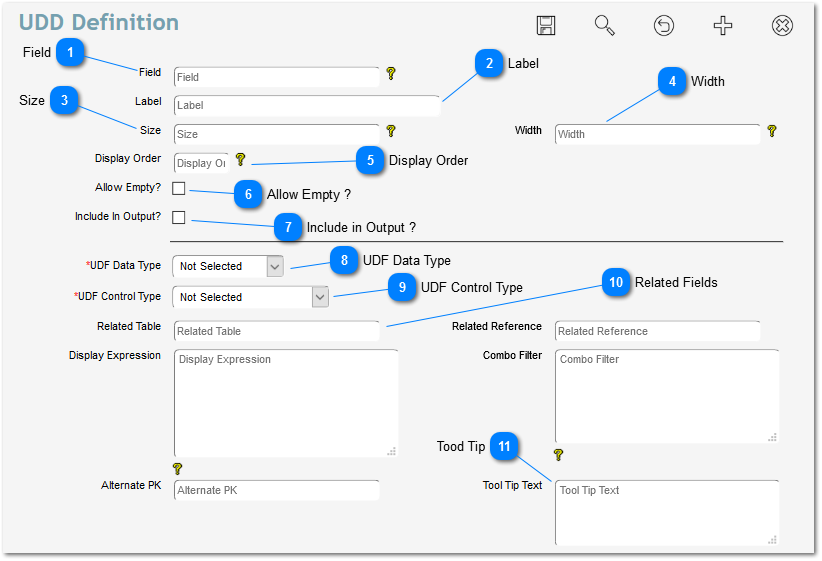
Field
It is really the Description. It just tells us what this record is about. To continue with our examle, enter BLOOD TYPE in that field.
This is the word that will sit to the left of the field in the name record page. It tells the user what this field is about. You would enter BLOOD TYPE there as well.
The Size field really refers to the height of the field. You can have different types of fields that may require a larger field. For example, you can have a text box where you might type a paragraph if needed. For this field ENTER THE NUMBER '3'. That is a good size for the field needed to store blood type. You may need to experiment a little to see what works best for your user defined fields.
You may need to experiment with this field also. The number you enter does not represent characters so it's not very exact. For blood type you could enter a 10 here just to create some extra space. You can come back and change it later if needed.
The Allow Empty check box is an important one. Checking the box means that you are saying "Yes, allow the field to be empty." If that box is not checked then the user, when they come to the UDF page that will be covered below, will not be able to leave the page until they put something in that field. If that's what you want, then don't check that box. In our example, however, we may not know the blood type for everyone so we want to check the box so that users aren't required to put something in that field when on that page.
Refers to the output options from name segmenter. In name segmenter you have the option to output the UDF fields in an Excel output. There may be some fields that you don't want showing in an Excel spreadsheet. You may store sensitive information about your donors that you don't want to be included in a spreadsheet that can be printed and passed around. So if this box is not checked, even though you tell name segmenter to output the UDF fields, this one will not be included.
Tells Denari what type of field to expect. The options here: Character, Date, Integer, and Memo. It's important that you choose the right one. For example, Denari will treat a date field differently than a memo field. In the example, you'll select CHARACTER. That allows us to put anything in the field, letters, numbers, punctuation, dashes and slashes, etc.
The UDF Control Type field helps control what the user enters into the field. They are: Combo (from display expression), Date, Memo, Related Combo Box, Text Box, Text Box with Email button, True False Check Box, and Wide Memo. Let's discuss each of these.
In looking at the list we see two Combo Box options, one that has the "From Display Expression" explanation next to it and the Related Combo Box. A combo box is a drop down field. When you click the drop down there are options in the list that the user can select. This is a good field type to use when you can because it forces every user to use the same options. It doesn't allow someone to just type what they want. But, you have to create that list. Denari is giving you two ways to do that. The first is by setting up a table that contains the options in the list. If you choose that option then a Denari programmer will have to set that up for you. No one chooses that option because the other method, "from display expression" is much easier. You will simply JUMP DOWN TO THE DISPLAY EXPRESSION field and enter the items there. You enter the options separated by a colon with no spaces. SO YOU MIGHT USE A:B:O:O NEGATIVE, etc. When your user comes to this field those are the options that they will have available to select from the drop down list.
The Date field is pretty self-explanatory. It will create a field that only allows the user to enter a date.
The Memo field will create a larger field to enter lots of text. You may want to adjust your Size and Width above to accommodate the needed size.
The Text Box is usually a smaller option than the memo field. It holds a single row of text and THAT'S THE ONE YOU WOULD SELECT to hold the Blood Type.
The Text Box with Email Button will create a text box but add a little button next to it that when pushed will open your email program on your computer and allow you to create and send an email. So this field would usually hold an email address. You might be saying here, "Yea, but Denari already has a place for email addresses" and you're right, so this field is a little redundant but you could use it for extra emails if needed.
The True/False Check Box is just that. You might use this to track whether someone has submitted a form, for example. Checking the box means Yes and not checking means No.
Wide Memo creates a field that spans the width of the two columns of information on the Denari page.
There are several other fields near the bottom of this page; Related Table, Related Reference, Combo Filter, and Alternate PK, that are all used with the Related Combo box option. Since you will probably never use that option you will also probably never use these fields. As mentioned above, if you use that option our programmer will need to set that up for you and he will be the one who will use these fields.
The tool tip appears when the user hovers their cursor over the field. Anything you put in this field will show in a little pop up window that will provide the user with instructions about the field. You might enter the sentence, "Enter the donor's blood type here". Your user will probably already have figured that out but sometimes the tool tip can be helpful.
Remember to hit Save to create your User Defined Field.
Populate the Field
The second step in this process then is to populate the field.
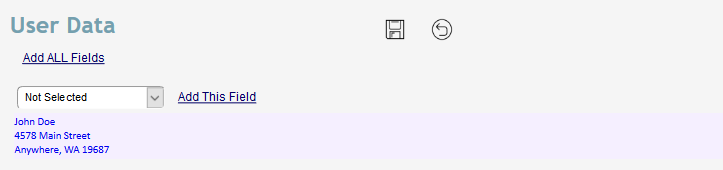
For that we will click the Names button on the left then Name List Management and select a the name record to record their blood type. Select User Data on the right.
This gives us a blank page. We can add fields to the page in one of two ways. We can click the "ADD ALL FIELDS" link at the top which will then add all of the UDF fields that we've set up to this page. Or, we can select a field from the list and click "ADD THIS Field" to add just that field. Select Blood Type from the drop down field and click 'Add This Field'.
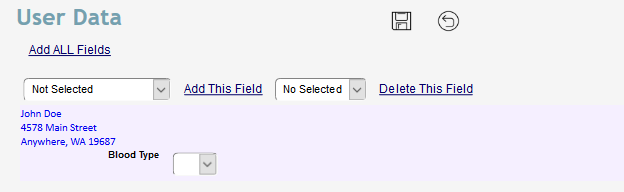
Click the Blood Type drop down and select the type that you set up earlier from the list. Click Save at the top to save the page.
You can also remove fields from the page by selecting the field in the drop down field at the top and click 'Delete This Field'. That will remove it from the page. It does not delete the field set up record.
As mentioned above, you can then use your UDF fields as filters for name segments that will allow you, as in our example, to get a list of names with a certain blood type.